Table of Contents
- Why Sediment Buildup Shortens Your Water Heater’s Lifespan
- Signs You Already Have Sediment Buildup
- Step-by-Step: How to Flush Sediment From Your Water Heater
- Water Heater Flushing Frequency: How Often Is Enough?
- Using a Water Softener for Sediment Prevention
- Water Heater Anode Rod Replacement: Your Tank’s First Line of Defense
- Common Mistakes That Speed Up Sediment Buildup
- Mistake 1: Treating the Water Heater as Maintenance-Free
- Mistake 2: Setting the Thermostat Too High
- Mistake 3: Flushing but Never Checking the Anode Rod
- Mistake 4: Running Hard Water With No Softener or Filter
- Mistake 5: Ignoring the Popping Until the Tank Fails
- Mistake 6: Skipping the Expansion Tank and Pressure Check
- DIY vs. Professional: What the Cost Comparison Actually Looks Like
- Frequently Asked Questions
Last Updated: September 22, 2026
Why Sediment Buildup Shortens Your Water Heater’s Lifespan
Water heater sediment is the accumulation of mineral deposits, mainly calcium carbonate and magnesium, that settle at the bottom of your water heater tank. It’s the most common reason water heaters fail early, and learning how to prevent water heater sediment buildup is one of the smartest maintenance habits a homeowner can build.
Watch Out
Ignoring sediment doesn’t just cost you money on energy bills. The overheating it causes can weaken the tank steel and lead to a rupture, which floods your home and turns a maintenance task into an emergency.Signs You Already Have Sediment Buildup
The clearest sign of sediment is a popping or rumbling noise from your tank, steam trapped under the sediment layer, telling you it needs attention.
Other warning signs include:
- Popping noises during heating cycles
- Foul-smelling hot water that smells like rotten eggs
- Less hot water than you used to get
- Higher energy bills with no change in use
- Rusty or cloudy hot water at the tap
Step-by-Step: How to Flush Sediment From Your Water Heater
Flushing your tank is the most direct way to remove settled sediment. It takes about an hour for a standard tank and needs no special tools.

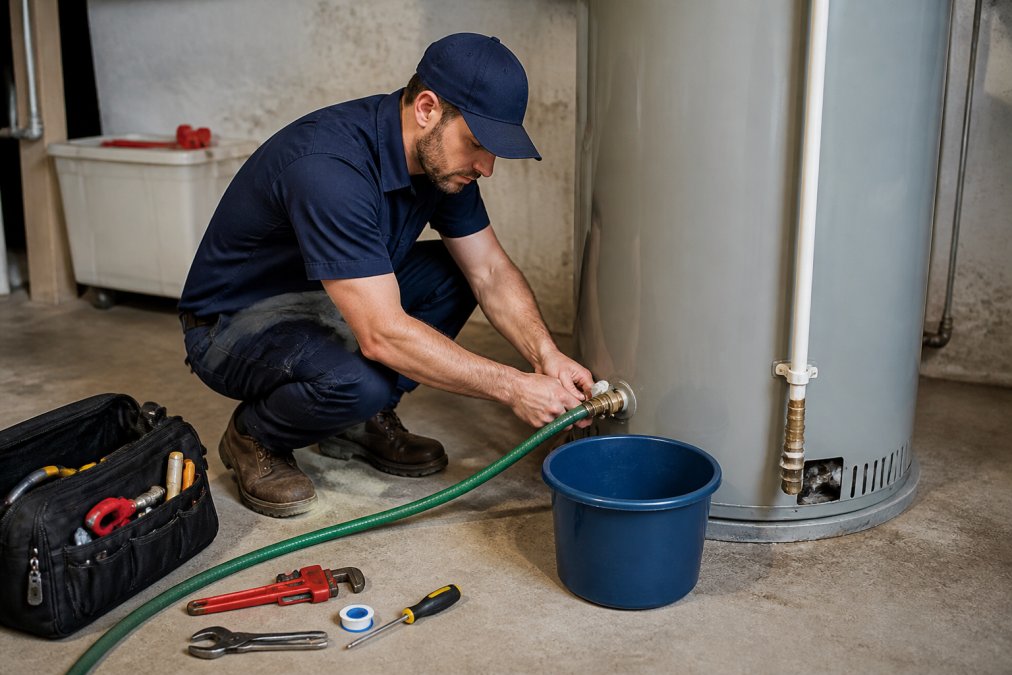
Plumber attaching a garden hose to a drain valve to clear water heater sediment from a residential tank What You’ll Need Before You Start
- A garden hose long enough to reach a drain or outside
- A bucket for the first burst of water
- Work gloves and eye protection
- A flathead screwdriver
Flushing the Tank Safely
- Turn off the power. For gas, set the dial to “pilot.” For electric, flip the breaker.
- Close the cold water supply valve at the top of the tank.
- Connect the garden hose to the drain valve at the bottom.
- Open a hot water tap upstairs to let air in.
- Open the drain valve and let the water run. The first few gallons will be cloudy with sediment.
- Flush until the water runs clear.
- Close the drain valve, remove the hose, and reopen the cold supply.
- Restore power once the tank is full.
The U.S. Department of Energy water heating guide recommends regular maintenance as one of the most cost-effective ways to keep a water heater running efficiently.
Pro Tip
Open the drain valve slowly the first time. If it’s clogged with hard scale, a full-force blast can send sediment flying and make a mess. A steady trickle clears the valve better.Water Heater Flushing Frequency: How Often Is Enough?
“Once a year” is a reasonable default for moderately hard water, but your interval should really be set by two things: your water hardness and how much hot water your household uses. A retired couple and a family of five on the same municipal supply build sediment at very different rates.
Start by Finding Out How Hard Your Water Actually Is
Water hardness is measured in milligrams per liter (mg/L) of calcium carbonate. The U.S. Geological Survey classifies water as soft below roughly 60 mg/L, moderately hard between 60 and 120 mg/L, hard between 120 and 180 mg/L, and very hard above 180 mg/L (Hardness of Water). Look up your area on the USGS water hardness map, or request a free consumer confidence report from your municipal supplier.
Water Hardness Typical Range Suggested Flush Interval Soft Under 60 mg/L Every 12 months Moderately hard 60-120 mg/L Every 9-12 months Hard 120-180 mg/L Every 6-9 months Very hard Over 180 mg/L Every 4-6 months Well water, no softener Varies, often >180 mg/L Every 4-6 months, plus a sediment filter Adjust for Household Size and Tank Size
Hardness is only half the equation, sediment accumulates in proportion to how much water the tank heats. If your household runs three or more showers a day, uses a dishwasher nightly, or has a hot tub on the same heater, shorten the interval by one step on the table above. A single occupant in a mild climate can often stretch a soft-water tank to 14-16 months.
The Two-Week Test That Beats Any Table
For a definitive answer: flush the heater, note the date, then flush again 90 days later and catch the first gallon in a clear bucket. If it’s cloudy or leaves grit, your interval is too long, cut it in half. If it runs clear, you can safely extend. It’s the same diagnostic plumbers use, and it costs nothing but a bucket and a few minutes.
Pro Tip
Write the flush date on a piece of masking tape and stick it to the side of the tank. The next owner of the home, or the next plumber who opens the panel, will thank you, and you’ll never have to guess when the last service was.What Happens If You Stretch the Interval
Sediment that stays in the tank long enough fuses under heat into a hard scale layer bonded to the tank floor. A standard gravity flush won’t remove it, the drain valve may even clog, and the tank must be descaled with a pump and mild acid, or replaced. That’s the difference between routine maintenance and a service call, and why the interval matters more than the flush itself.
Using a Water Softener for Sediment Prevention
A water softener is the most effective long-term fix for sediment, removing minerals before they reach your tank. It’s the prevention step most guides skip, and the one that saves the most money over time.
Key Takeaway
Flushing removes sediment that’s already there. A water softener stops it from forming in the first place. The best results come from doing both.Water Heater Anode Rod Replacement: Your Tank’s First Line of Defense
The anode rod is a sacrificial metal rod inside your tank that corrodes instead of your tank steel. Most homeowners never check it, once the rod is used up, corrosion attacks the tank itself.
Common Mistakes That Speed Up Sediment Buildup
Most sediment problems come from small, repeated decisions that quietly accelerate mineral accumulation. Here are the ones that show up most often, and what each costs you.
Mistake 1: Treating the Water Heater as Maintenance-Free
A tank water heater is rated for roughly 8-12 years, but that assumes annual flushing and periodic anode rod inspection. Skip both and the realistic lifespan drops to 5-7 years. Replacing a 50-gallon gas tank heater can be a significant investment; an annual flush costs almost nothing DIY and can be a reasonable expense from a plumber. The math is not close.
Mistake 2: Setting the Thermostat Too High
Scale formation accelerates as water temperature rises. Many homeowners crank the dial to 140°F or higher, not realizing that every 10°F above 120°F roughly doubles the rate at which dissolved calcium carbonate precipitates out. The U.S. Department of Energy recommends 120°F for most households, hot enough for showers and dishes, cool enough to slow scale.
Mistake 3: Flushing but Never Checking the Anode Rod
The anode rod corrodes so your tank steel doesn’t. Once it’s more than half consumed, the tank itself corrodes, and the resulting iron oxide adds to the sediment load while shortening the tank’s life. A replacement rod can be an affordable part, and professional installation is also an option. Checking it takes ten minutes with a 1-1/16-inch socket once a year, skipping this is a common reason a tank fails prematurely.
Mistake 4: Running Hard Water With No Softener or Filter
If your supply is above roughly 120 mg/L of calcium carbonate, you’re feeding the tank scale daily. A whole-house ion-exchange softener can be a significant investment, plus ongoing costs for salt. A cartridge sediment filter is far cheaper but only catches particulate matter, not dissolved minerals, so it slows sediment without stopping scale.
Mistake 5: Ignoring the Popping Until the Tank Fails
That rumbling or popping is steam flashing under a sediment layer, meaning the burner is overheating the tank floor because heat can’t transfer into the water. Left alone, the steel fatigues, the glass lining cracks, and the tank eventually ruptures, usually without warning. A water alarm and drain pan are cheap insurance, but the real fix is flushing before the popping starts.
Mistake 6: Skipping the Expansion Tank and Pressure Check
Thermal expansion stresses every component, including the tank lining. If your home has a closed plumbing system (most built after the mid-1990s, or any with a backflow preventer or pressure-reducing valve), you need a thermal expansion tank. Without one, pressure spikes can crack the glass lining, exposing bare steel to corrosion and adding rust to the sediment layer.
DIY vs. Professional: What the Cost Comparison Actually Looks Like
Task DIY Cost Professional Cost Notes Annual flush $0-$30 (hose, bucket) $100-$250 DIY is realistic for most homeowners Anode rod replacement $20-$60 (part) $150-$300 Requires a socket and some upper-body strength Descaling a scaled tank Not practical $250-$500 Needs a pump and mild acid Water softener install Not recommended $1,500-$4,000 Permits and drain lines usually required Full tank replacement Not recommended $1,200-$2,500 Gas, venting, and code compliance involved The pattern is consistent: routine prevention is cheap and DIY-friendly, while scale removal, gas connections, and code compliance are worth paying a licensed plumber for. The mistake isn’t choosing one path, it’s choosing neither until the tank fails.
Watch Out
If your water heater is more than ten years old, has never been flushed, and is now making popping noises, do not assume a DIY flush will fix it. A tank in that condition can develop a leak the moment the drain valve is opened. Have a plumber inspect it first.Best For
Homeowners on well water or in areas with hard water, who want to stop sediment before it starts rather than fight it every few months.Frequently Asked Questions
What are the signs of sediment buildup in a water heater?
The most common signs are popping or rumbling noises as the burner heats through the sediment layer, reduced hot water recovery, and higher energy bills. You may also notice discolored or foul-smelling hot water. These symptoms happen because sediment buildup forces the heating element to work harder and longer to heat the same amount of water. If you hear popping from your tank, schedule a flush before the mineral deposits harden further.
How often should sediment be removed from a water heater?
Most manufacturers recommend flushing the tank once a year. If your home has hard water with high mineral content, flush every six months instead. Homes with a water softener for sediment prevention can often stretch to 12 to 18 months between flushes. If you have never flushed your tank and it is more than five years old, have a licensed plumber inspect it first, since a heavy sediment layer can clog the drain valve during a DIY flush.
Can sediment buildup cause a water heater to leak?
Yes. As sediment collects at the bottom of the tank, it traps water against the steel and accelerates corrosion. Over time, that corrosion can eat through the tank wall and cause a leak. Sediment also overheats the tank floor, which weakens the metal. A leaking tank usually cannot be repaired and needs replacement. Regular flushing, anode rod replacement, and water softening are the best ways to prevent this outcome.
Should you flush a 20-year-old water heater?
A 20-year-old tank is past its typical service life, and flushing it can sometimes dislodge rust or scale that was sealing small leaks. If your tank is that old and has never been flushed, have a licensed plumber inspect it before attempting anything. In many cases, replacement is the safer investment. Most tanks last 8 to 12 years with annual maintenance, so a 20-year-old unit has already exceeded expectations.
CALL 727-475-1474 and 813-579-1920


CFC 1427929
Serving Pasco County 25+ Years
info@purplumbing.com
How to Prevent Water Heater Sediment Buildup
September 23, 2026 | Blog
- Reageer
For more information or to request an appointment dial 727-475-1474 and 813-579-1920
Serving Pasco County 25+ Years, info@purplumbing.com
Carrollwood
Clearwater
Dunedin
Holiday
Land O Lakes
Lutz
New Port Richey
Oldsmar
Palm Harbor
Plant City
Saint Petersburg
Tampa
Tarpon Springs
Temple Terrace
Town N Country
Trinity
West Chase
Site Designed by GoProLocal