Table of Contents
- Tools and Safety Checks Before You Adjust the Toilet Tank Water Level
- Identify Your Fill Valve: Float Ball, Float Cup, or Diaphragm
- How to Adjust Toilet Float: Step-by-Step for Every Valve Type
- How to Test the Water Level After Adjustment
- Fixing a Toilet Tank Water Level Too Low
- Fixing a Toilet Tank Water Level Too High
- When Your Toilet Tank Keeps Filling (and How to Stop It)
- Frequently Asked Questions
Last Updated: October 6, 2026
Tools and Safety Checks Before You Adjust the Toilet Tank Water Level
Learning how to adjust water level in toilet tank settings starts with a few basics, and knowing how to adjust water level in toilet tank hardware is the same skill. Most tanks have a simple fill valve with a screw or float you can tweak in minutes.
A toilet tank water level that is too high wastes water. One that is too low leaves the bowl weak. Either way, the fix is usually the same.
Gather these tools first:
- Adjustable wrench or pliers
- Sponge or towel
- Flashlight
- Flathead screwdriver
- Tape measure or ruler
Now the safety steps. Turn the shut-off valve behind the toilet clockwise until the water stops. Flush once to drain the tank. Dry your hands before touching any electrical parts nearby.
Watch Out
Never force the adjustment screw. Plastic valves crack easily, and a cracked valve means a full valve replacement instead of a quick tweak.Identify Your Fill Valve: Float Ball, Float Cup, or Diaphragm
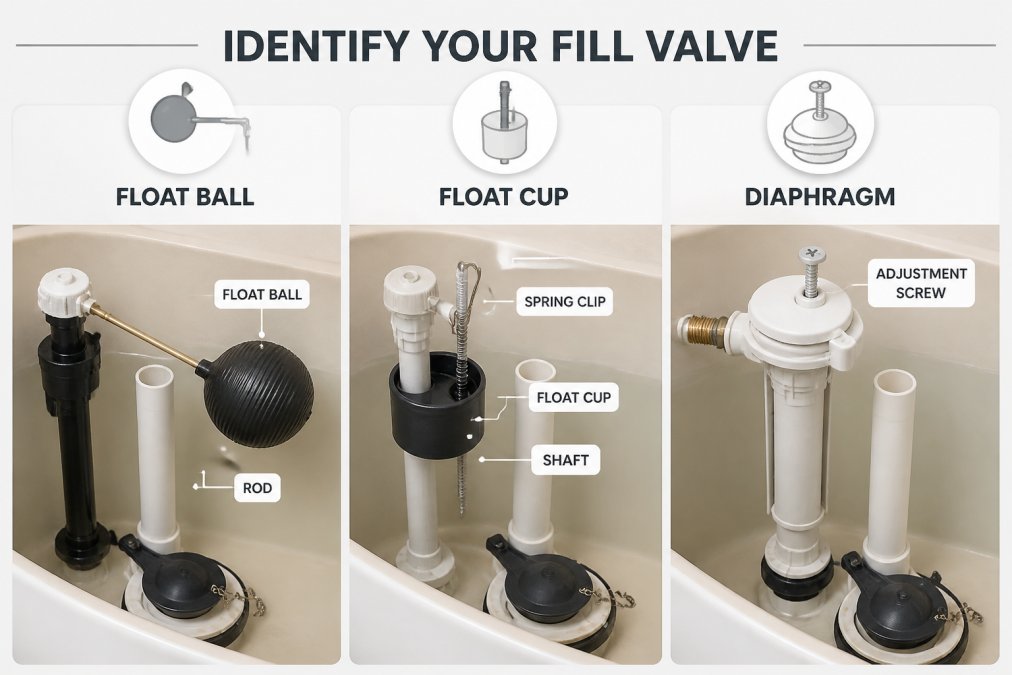
The fill valve type decides how you adjust the water level, because each design senses the water line differently. There are three common types in modern homes, and the adjustment point is in a different place on each one.
A fill valve is the mechanism inside the toilet tank that refills the tank after a flush and controls the water level. It opens when the tank empties and closes when the water reaches the set point. How it knows the tank is full is what separates the three types:
- Float ball (ballcock): A large round ball on a metal or plastic arm, the float rod. The ball rides on the water surface. As the water rises, the arm lifts and the valve shuts off. Adjustment is at the screw where the rod meets the valve body, or by bending the rod itself.
- Float cup: A plastic cup that slides up and down a vertical shaft. The cup rides the water surface on the outside of the shaft, and a spring clip locks it in place. Adjustment is the clip position on the shaft, no screwdriver needed on most models.
- Diaphragm valve: A compact unit with a pressure-sensitive diaphragm and a roller clamp on the refill tube. It senses level through the diaphragm rather than a floating arm, and adjustment is a small screw near the top of the unit.
Look inside the tank with a flashlight and match what you see:
- A round ball on a horizontal arm → float ball.
- A cup riding a vertical shaft, with a spring clip → float cup.
- A short, compact body with a screw on top and a small clamp on the refill tube → diaphragm.

Side-by-side comparison of a float ball on its rod, a float cup on its shaft with the spring clip visible, and a diaphragm valve with its top adjustment screw, all photographed inside toilet tanks Why the distinction matters before you touch anything:
- The adjustment point is different on each type. Turning the wrong screw, or bending a rod on a valve that uses a cup, does nothing or breaks plastic.
- Replacement parts are not interchangeable. A float cup assembly will not drop into a tank plumbed for a ballcock without swapping the refill tube routing.
- Float balls and float cups are the two you will meet in most homes; diaphragm valves show up more often on newer, low-flow models.
Pro Tip
Snap a photo of the valve before you adjust it. If you need a replacement, the photo plus the model number stamped on the valve body is enough for most hardware stores to match the part.Knowing which one you have saves you from buying the wrong replacement part or turning the wrong screw.
How to Adjust Toilet Float: Step-by-Step for Every Valve Type
Here is how to adjust toilet float settings for each valve type. The goal is the same for all three: get the water to sit about one inch below the top of the overflow tube.
Adjusting a Float Ball and Float Rod
- Turn off the water and flush the tank.
- Find the adjustment screw where the float rod meets the fill valve.
- Turn the screw clockwise to lower the water level.
- Turn it counterclockwise to raise the water level.
- Turn the water back on and let the tank refill.
- Check the new level against the overflow tube.
If there is no screw, bend the float rod down slightly to lower the level or up to raise it. Do this in small steps.
Adjusting a Float Cup or Diaphragm Valve
- Shut off the water and flush.
- Pinch the spring clip on the cup and slide it down the shaft to lower the level.
- Slide it up to raise the level.
- For diaphragm valves, turn the adjustment screw on top instead.
- Turn the water on and watch the tank refill.
Pro Tip
Mark the shaft with a pencil before you move the cup. If you overshoot, you can slide it right back to where you started.How to Test the Water Level After Adjustment
Testing takes about two minutes. Let the tank refill fully, then measure from the water line to the top of the overflow tube. The gap should be about one inch.
- Too high: water trickles into the overflow tube and down the drain. That is water waste.
- Too low: the flush is weak and the bowl does not refill properly.
- Just right: the tank fills, stops, and stays quiet.
Flush the toilet three times in a row. Watch the water line each time. If it holds steady, your calibration is done.
If the level drifts up or down after a few flushes, the valve may need a new gasket or a full replacement. That is a common sign of a worn inlet valve.
Fixing a Toilet Tank Water Level Too Low
A toilet tank water level too low usually means a weak flush and a dirty bowl. The tank is not holding enough water to push waste through the trapway.
The tank level is adjustable. The bowl level is not. The water that sits in the bowl after a flush is set by the geometry of the trapway, the S-shaped channel cast into the porcelain, not by the fill valve.
With that cleared up, here is what actually causes a low tank level:
- Float set too low on the shaft or rod
- Shut-off valve not fully open
- Clogged inlet valve screen (the small mesh filter where the supply line meets the fill valve)
- Worn gasket letting water seep past the seal
- Refill tube not seated in the overflow tube, so the bowl never gets its post-flush top-off
Start by sliding the float cup up about a quarter inch, or turning the float-ball screw counterclockwise a quarter turn. Flush and check. If that does not help, check the shut-off valve behind the toilet and open it fully.
When the Cause Is Supply Pressure, Not the Valve
A low tank level can also point to low water pressure in the home. The fill valve can only pass what the supply line delivers. If other fixtures show weak flow too, a sputtering kitchen faucet, a shower that has lost its force, the issue is not the toilet.
A quick check: open a nearby sink faucet while the toilet refills. If the sink flow drops noticeably when the toilet is filling, the two fixtures are competing for the same supply. That is a plumbing-capacity issue, not a fill-valve adjustment.
A common pattern is a fill valve that works fine at high pressure but stalls at low pressure, the diaphragm or cup cannot lift enough to close cleanly, so the tank fills slowly and never quite reaches the set line.
Key Takeaway
Tank level is yours to adjust. Bowl level is fixed by the trapway. If the bowl is the problem, look at flush strength and clogs, not the float.Fixing a Toilet Tank Water Level Too High
A toilet tank water level too high sends water straight down the overflow tube. You hear it running long after the flush. That is money going down the drain.
What to do:
- Slide the float cup down the shaft in small steps
- Turn the adjustment screw clockwise on float ball and diaphragm valves
- Check that the refill tube is not pushed too far into the overflow tube
- Look for a stuck float that cannot drop
The refill tube should sit above the water line, not inside it. If it sits inside, it can siphon water out of the tank all day. Pull it up and clip it so the end sits above the overflow tube.
Key Takeaway
The sweet spot for tank water level is about one inch below the overflow tube. Higher wastes water. Lower weakens the flush.When Your Toilet Tank Keeps Filling (and How to Stop It)
A toilet tank keeps filling when the fill valve cannot sense that the tank is full. The water runs, the overflow drains it, and the cycle repeats.
The usual culprits:
- A worn or cracked flapper that will not seal (the EPA)
- A float that is stuck or set too high
- A failing fill valve diaphragm
- Mineral buildup on the valve seat
Shut off the water and inspect the flapper first. It is the cheapest part to replace and the most common cause. If the flapper looks fine, the fill valve itself is likely done. A full valve replacement is a straightforward job.
If you have tried the adjustments and the tank still will not hold, it is time to call a licensed plumber. PUR Plumbing handles toilet repairs and fixture installations across Pasco County with fully stocked trucks, so most jobs are finished in one visit.
Frequently Asked Questions
How high should the water level be in a toilet tank?
The water level should sit about 1 inch below the top of the overflow tube. If it rises above that line, water will spill into the tube and run into the bowl continuously, wasting water. If it sits too low, the flush loses power and the bowl may not refill properly. Mark the fill line on the tank wall with a pencil so you can confirm the level after each adjustment.
Why is the water level in my toilet bowl low even when the tank is full?
A full tank and a low bowl usually point to two different problems. The bowl level is set by the refill tube, which must stay clipped to the overflow tube and aimed into it. If the refill tube is loose or missing, the bowl never gets its post-flush refill. A clogged rim jet or a blocked trapway also keeps the bowl from filling. Check the refill tube first, then clear the rim holes.
Why does my toilet tank keep filling up with water?
A tank that keeps filling after the flush cycle ends almost always has a leaking flapper or a worn fill valve seal. Water escapes into the bowl, the tank level drops, and the fill valve restarts. Lift the flapper and check for mineral buildup or a warped edge, then inspect the fill valve for debris. Replacing a flapper costs little and takes a few minutes. If the tank still refills on its own, the fill valve needs replacement.
How do I adjust my dual flush toilet?
Dual flush toilets use a taller fill valve with a marked water line, and most have a small adjustment screw or clip on the valve body. Turn the screw clockwise to raise the level or slide the clip down to lower it. Set the water about 1 inch below the overflow tube, then run both the half flush and full flush buttons to confirm the level holds. If the valve has no adjustment, the fill valve itself must be replaced.
A toilet that runs, leaks, or will not hold the right water level can waste hundreds of gallons a month and drive up your bill. If the adjustments above do not fix it, our licensed team at PUR Plumbing can diagnose and repair the problem fast. We offer timely, professional repairs, quick response for plumbing emergencies, and honest pricing on every job. Get started with PUR Plumbing and get your toilet running right the first time.
CALL 727-475-1474 and 813-579-1920


CFC 1427929
Serving Pasco County 25+ Years
info@purplumbing.com
How to Adjust Water Level in Toilet Tank (2026 Guide)
October 6, 2026 | Blog
- Reageer
For more information or to request an appointment dial 727-475-1474 and 813-579-1920
Serving Pasco County 25+ Years, info@purplumbing.com
Carrollwood
Clearwater
Dunedin
Holiday
Land O Lakes
Lutz
New Port Richey
Oldsmar
Palm Harbor
Plant City
Saint Petersburg
Tampa
Tarpon Springs
Temple Terrace
Town N Country
Trinity
West Chase
Site Designed by GoProLocal